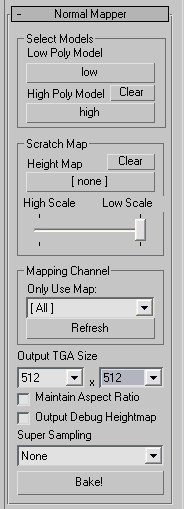
Normal Mapper
Normal Mapper
![]()
This tutorial covers the basic steps of installing the Amp II normal mapper plugin and how to use it. The plugin generates tangent space dot 3 normal maps, so if your engine uses something other than that, then our tool will not work for you.
Getting Started
![]()
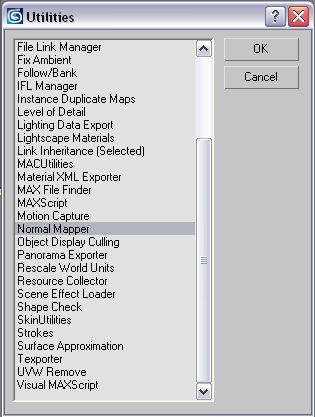
Extract or copy the file named normal mapper.dlu into your 3dsmax/plugins folder. Then start 3D Studio Max and under the utilities tab ![]() you will have to click more, and then a list of utilities appear, select "normal mapper" from the list as shown:
you will have to click more, and then a list of utilities appear, select "normal mapper" from the list as shown:
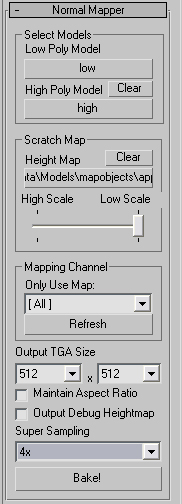
Once you select the Normal Mapper from the list a Normal Mapper dialog with a + should appear and look like this:

Expand the dialogue by clicking anywhere on the Normal Mapper button and it will look like this:
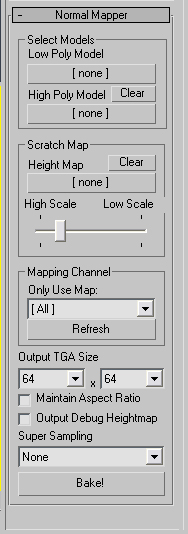
I'll now explain briefly what each button or roll out does.
Select Models allows you to pick from a list or click on an object to select the models you want to generate normal maps with.
Low Poly Model is self explainatory. This is the model you have unwrapped and will use in game most of the time (more on this later).
High Poly Model is where you select your high poly detailed model for generating details into your normal map.
Scratch map is for adding details into your normal map through a height map or 2D image. This is useful for scratches, rivets, or anything that would be difficult to model in 3D on your high poly model. The scale slider is to intensify the results of your height map. I recommend sliding it all the way to the right to the lowest scale possible.
Mapping channels is if you have multiple materials assigned to your mesh, you can pick a UV channel or material name and it will generate normal maps only from those UV's. This is useful if you have a contiguous mesh but have more than one texture on it, such as a character often has a different head texture than the body.
Output TGA Size. This determines the dimensions of the generated normal map. The first is height and the 2nd is width. Maintain Aspect Ratio will make the image a square.
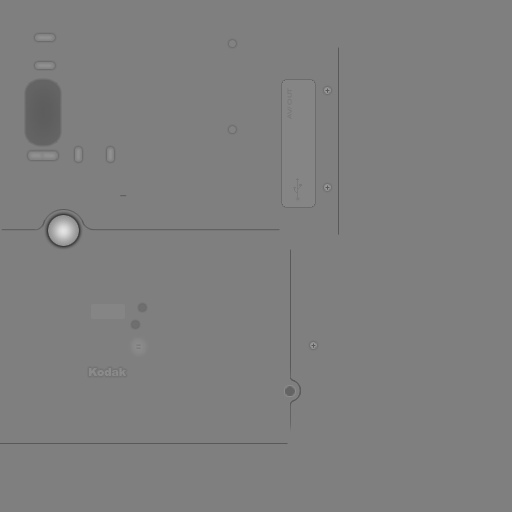
Output Debug Heightmap will generate a greyscale height map or "bump map" generated from your high poly model, useful for rendering bump maps.
Super Sampling is recommended at the highest setting (4X) for final output. For quick testing of high resolution normal maps, use a lower setting like none to save time setting up your normal map, as rendering a high resolution normal map at 4X super sampling can take some time for higher detail models, so it's best to test it at lower resolutions with no super sampling at first. Super Sampling will render the normal map up to 4 different times from various angles and then average them together into one image resulting in very high quality normal map generation.
Bake. This will render your normal map.
Example of Normal Map generation
![]()
I'll now walk through the basic steps of setting up a scene for normal map generation. For this tutorial, we are making a digital camera. I'll assume you already know how to model low and high polygon models and skip the 3D modeling tutorials. See an example below of a low and high polygon model.
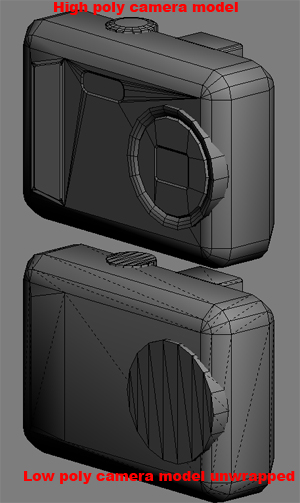
Now to render a normal map, these models must share the same space in the world as shown:

It's hard to tell, but there are two cameras in the picture above, they are sharing the same space. One is low polygon and the other is high polygon. Now lets get started setting up the normal mapper to render the normal map. Under Select Models, click the "Low Poly Model" button, and then in Max's toolbar, click "select by name" ![]() and a list will appear. Select the low polygon unwrapped model. It's name should appear in the normal mapper button. Repeat this process for the high polygon model. Click "High Poly Model" and then from select by name you select your high detail model. Alternatively you can click on them in the view port, but since they are sharing the same world space it's sometimes difficult to pick the correct model, so I always use select by name.
and a list will appear. Select the low polygon unwrapped model. It's name should appear in the normal mapper button. Repeat this process for the high polygon model. Click "High Poly Model" and then from select by name you select your high detail model. Alternatively you can click on them in the view port, but since they are sharing the same world space it's sometimes difficult to pick the correct model, so I always use select by name.
Now we're set up to do our first rendering test. For this model I want to use a 512 x 512 image, so set the output TGA size dialogs both to 512. At this point, the plugin would look like this:
Now I'll go ahead and bake the scene with no super sampling, as a quick test to make sure all is good. This is what it looks like:
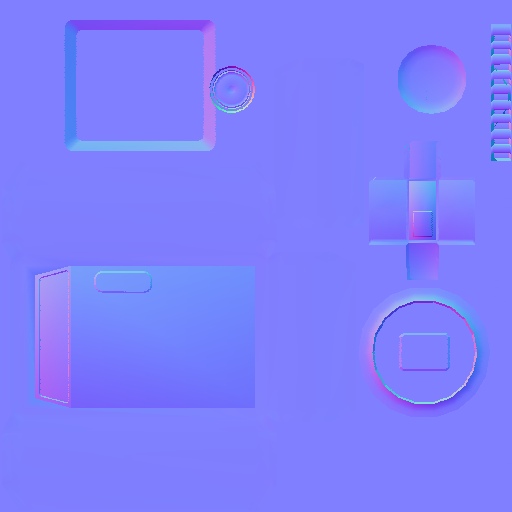
Now I want to use a height map to add in some more details on the camera that I felt would be too time consuming to model in 3D on my high polygon model. Here is the height map I came up with. Note that the more contrast in your image, the deeper it will burn these details into your normal map, so you can adjust the contrast or use the high scale and low scale slider also, but for consistent results I always use the lowest scale and then just adjust the contrast of my image to control the depth. Here is what my height map looked like:
As you can see, dark lines or areas will dig a hole, and lighter pixles on the texture will make a raised spot. I added some depressions and buttons, holes and seams to the normal map all done in 2D. This is mostly a user preference, but I feel a lot of time can be saved using a height map to add in finer details. I try to do the major big parts in 3D on my high model, and then add in finer details using scratch or height maps.
Now lets add the height map to the normal map. To do so, under Scratch Map click on the height map button and select an image from your hard drive. By default, it looks for images with an _h.tga on the end of the file name. You might have to add an asterix to the field to select a file named otherwise. So once I selected my height map which was named camera_h.tga, and set super sampling on, the normal mapper dialogue looked like this:
Now we'll go ahead and bake the normal map. The final result looks like this:
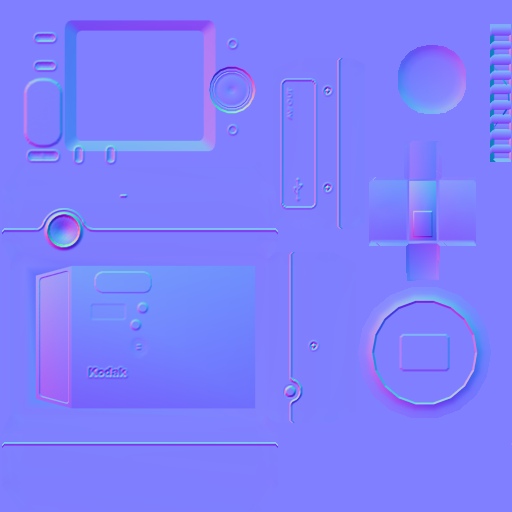
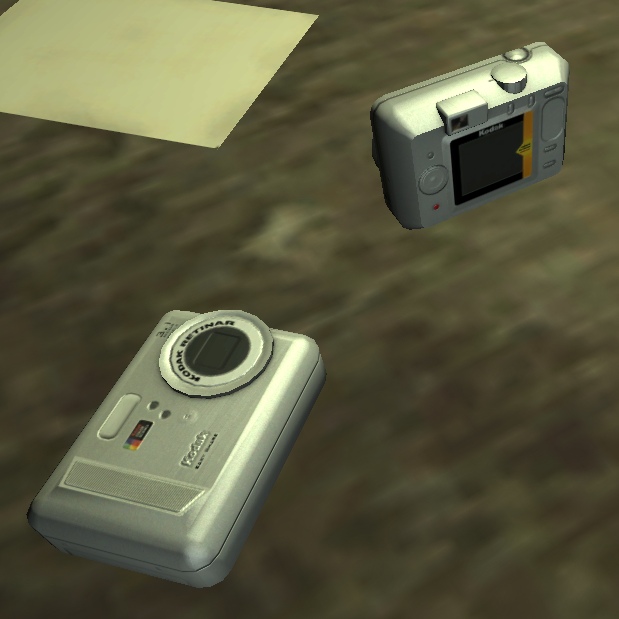
Now all the fine details from the height map have been baked into the normal map, saving a lot of time and effort. The final camera rendered like this in our AMP 2 engine:
This concludes the basic tutorial on how to use the plugin.
Additional Tips:
If you get strange artifacts or colors in your normal maps, make sure to reset xform and collapse all the stacks on both your low and high polygon models. The reset X form modifier is under the utilities tab.
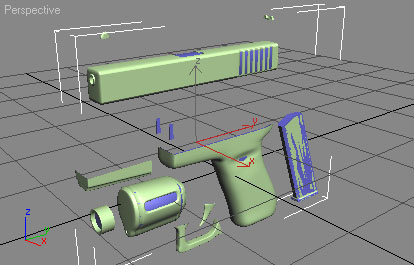
For complex models with a lot of separate meshes, you might have to "explode" both your models. This means moving all the parts around so that the normal mapper's rays can reach each part separately. Also you can lower the smoothing group threshold on your lower polygon model to cast more rays at the model from different angles. Imagine each smoothing group as a direction normal maps are sampled from. The lower the smoothing group #, the more breaks you will get in your model, however sometimes this is needed to get better normal map results. See an example of an exploded model. Make sure to back up your original unwrapped model and use it in game. The exploded version is only to generate normal maps.